Restore Plugin Bundle by Sonnox , a bundle of three precise noise reduction plug-ins, is 94% OFF at the lowest price ever of $29.

Restore Plugin Bundle by Sonnox , a bundle of three precise noise reduction plug-ins, is 94% OFF at the lowest price ever of $29.
This is a final sale due to the completion of development.
Important notice: This product will no longer be available for sale on July 14th. You can purchase it at this price for a limited time, but please note the following conditions.
- You can continue to download, install, and authenticate as usual.
- Sonnox will provide full support for these plug-ins until September 30, 2025.
- Your license is valid forever.
- The plug-ins will continue to work on all currently supported systems.
- After the sale ends on July 14th, it will no longer be available for purchase.
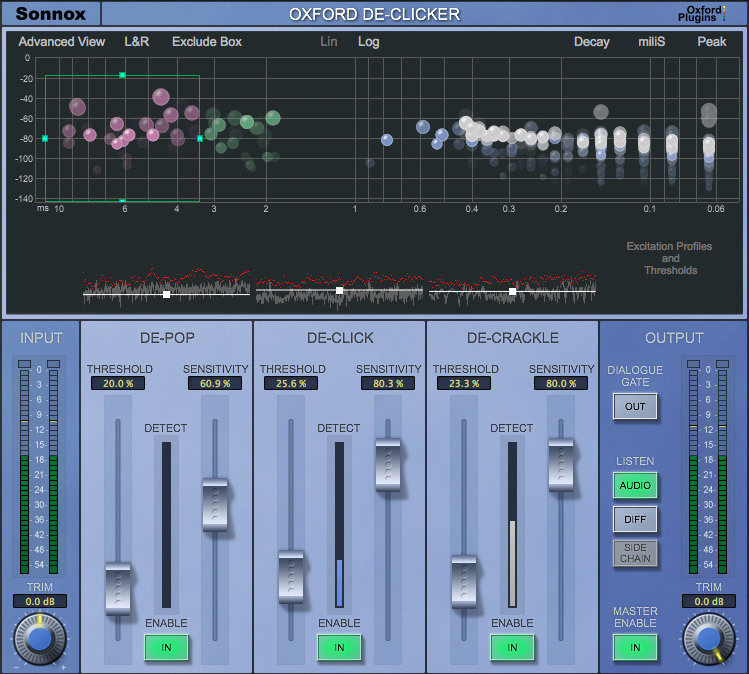
Oxford DeClicker
Features
3 sections with separate thresholds and controls: DePop, DeClick, DeCrackle
Event display provides intuitive visual feedback of the energy and duration of detected events.
"Exclusion box" to select events not to repair
Dialogue mode allowing two independent control settings depending on the input level
Excitation display to aid in precise setting of threshold control
Three audition modes including option to listen only to removed events
Advanced algorithms for accurate detection and high quality repair
Oxford DeClicker has three main sections: DePop, DeClick and DeCrackle. These sections process events of duration up to 10ms, 3ms and 0.4ms respectively. Each section has threshold and sensitivity controls as well as an excitation profile showing the residual signal that remains after removing harmonic content. The excitation profile shows how far the signal deviates from the expected signal.
The threshold control determines how many events are detected and the sensitivity control determines how many of the detected events are repaired.
Event graph
The event graph is an important visual display that displays the detected events. Events are displayed with duration on the X-axis and amplitude/energy on the Y-axis.
The graph shows green bubbles (DePop), blue bubbles (DeClick) and white bubbles (DeCrackle). The size of the bubbles indicates the volume and also the height from the horizontal axis. Each section has an IN button, when you disable a section with the IN button, the bubbles for that section will be displayed in red. This means that these events were detected but not repaired.
Exclusion Box
One of the unique features of Oxford DeClicker is the "Exclusion Box" that allows you to exclude detected events from the repair section. The key in audio restoration is always to find the best compromise between removing unwanted noise and leaving the desired audio intact without losing too much high frequency content.
The Exclusion Box assists this process by allowing you to make exceptions to what is repaired. This way you don't have to struggle with the sensitivity control to find a compromise. For example, you may be happy with a piece and the repair results, but the brass section is over-detected and corrected for high energy events, resulting in a loss of brightness. Similarly, you may see popping noises in the display and know that they are part of the "desired audio", but are otherwise happy with the control settings. Simply draw a box around the area on the graph you want to exclude; any events detected within that area will not be repaired (they will be displayed in red).
Dialogue Mode
Another example of the flexibility of Oxford DeClicker is the Dialogue Mode, which allows you to set two independent banks of controls separately for dialogue and background.
For example, you may want to have completely different threshold/sensitivity settings during dialogue and completely different threshold/sensitivity settings during pauses between dialogue. Dialogue Mode allows you to control the "upper set" and "lower set" independently by setting the thresholds, giving you more control. In addition, there is a side-chain filter that allows you to set the threshold between the upper and lower sets in even finer detail.
Output
The Listen section of the Output panel has an option to listen to the difference between the input and the processed output. This is labelled "Diff" and is particularly useful for listening to what has been repaired. It is also useful for listening to the quality of the repair without the audio material getting in the way.
DeBuzzer
Features
High performance hum and buzz removal using advanced algorithms
Separate detection and removal sections for an intuitive workflow
Scalable high resolution FFT of the input signal shows the strongest harmonics and removal filters
Very accurate setting of the fundamental frequency across three frequency ranges
Integrated frequency display shows the strength of the fundamental
Tracking mode can be set to Auto or Fast to track the fundamental as it varies in frequency, or Freeze to track the fundamental as it varies in amplitude
Choice of removal filter: Comb for general purpose narrow removal of many harmonics, Parametric EQ for more musical removal of few harmonics
Two listening modes with option to hear the removed buzz
Oxford DeBuzzer is divided into two stages: detection and removal.
Buzz removal is usually done with a comb filter, which has many narrow notches to remove the fundamental frequency of the buzz and its associated harmonics. For this process to be effective, the fundamental frequency must be identified very accurately.
DeBuzzer has several ways to help you isolate the fundamental frequency.
First, the peak profile displayed above the central rotary control shows the strength of certain nominal frequencies in the input signal. Second, the large FFT display highlights frequency components that are always present and make them stand out on the graph. The three highest peaks detected are automatically marked, and you can set the nominal frequency by clicking on any of the peaks on the graph.
The third way to isolate the fundamental frequency is to use the tone generator. Just like tuning a guitar, the beat frequency between the fundamental and the fundamental gets gradually slower as you approach the fundamental.
Three Tracking Modes
DeBuzzer has three modes: Fast, Auto, and Freeze. By default, the plugin is set to Auto mode, which continuously detects peak profiles on either side of the nominal frequency. When the lock strength exceeds a certain level, the plugin automatically sets the nominal frequency to the frequency of the peak. If the hum frequency fluctuates, the detector follows it. Auto mode is good for tracking weak, slowly varying fundamentals and works in all three frequency bands. In Fast Tracking mode, the removal filter automatically tracks the rapidly varying fundamentals.
In Auto mode, you set the nominal frequency with the large central rotary knob to within about 5Hz of a 50Hz or 60Hz hum frequency and the plugin will automatically set itself to approach the detected frequency (DeBuzz Details) and remove the hum. Once the hum has disappeared, you can select Freeze mode to set the nominal frequency to that frequency and stop the detector hunting.
The large central rotary control can be set to control three frequency ranges determined by the LF, MF and HF buttons, with a very fine resolution of 1/10,000Hz.
To remove noise or whistles, it is best to set it to Freeze mode and use an FFT to identify the frequency of the noise. The noise will appear as a peak on the plot. Clicking on the peak will set the plugin to remove that frequency.
Selecting a Filter
As for the removal filter, the default is the comb filter. However, if you select Parametric EQ mode, you can use the Parametric EQ section to remove the fundamental and harmonics. If the buzz contains a lot of harmonics or the frequency of the buzz fluctuates, a Comb filter is best. If there are only one or two harmonics to remove, a Parametric EQ filter may sound better.
In Para-EQ mode, you can use the Slope control to reduce attenuation as the frequency increases, and you can choose to notch out odd and even harmonics instead of just odd harmonics.
Output
The Listen section of the Output panel has the option to listen to the difference between the input and the processed output. This is labeled "Diff" and is particularly useful for listening to the parts that have been restored. It is also useful for listening to the quality of the restoration without being distracted by the audio material.
Oxford DeNoiser
Features
High-performance noise reduction using advanced algorithms
Separate DeHisser, Detect and Remove sections for an intuitive workflow
High-resolution FFT of the input signal showing the noise profile
Effective dehisser for pre-processing of wideband noise reduction
Detector noise profile can be set to Auto, Freeze or Manual
Adjustable bias curve allows you to control noise threshold and reduction in frequency bands
Two listening modes with option to listen to removed noise
Warmth control for extra sweetness after noise reduction
Make-up gain for true A/B comparison
Oxford DeNoiser uses a variety of advanced techniques to remove wideband noise from audio material. The key to good noise reduction is to help the user achieve satisfying and accurate results, rather than encouraging overuse of the controls.
The Oxford DeNoiser is based on the concept of a "noise profile". This noise profile is used to gate out what lies below it and retain what lies above it in the frequency spectrum. There are several ways to reach an appropriate noise floor:
3 Detection Modes
Mid/Side Mode
The DeNoiser has a Mid/Side mode, in which the plugin denoises only the Side signal content of the Left and Right signals, leaving the Mid content untouched. The Left and Right signals are first converted to Mid-Side, then the Side signal is denoised, and finally the signal is converted back to Left and Right. This is especially useful in broadcasting, where switching between stereo and mono must not result in a noticeable change in the dominant noise content.
Denoising only the side channels has no effect whatsoever on mono operation. On the other hand, stereo operation gives a cleaner stereo image without affecting the center sound. Also, when recorded with mid-side microphone techniques, noise is often noticeable in the side signal, since it is mainly ambience. When converting a mid-side recording to L/R, the DeNoiser's mid-side mode allows you to denoise only the side content.
Sweetener
After removing noise, in some situations you may want to add something back to the signal you removed. For example, denoising can make the material sound a little flat compared to the original. The output section of the Oxford DeNoiser has a "Warmth" control, which allows you to quickly add a richer timbre to your material.
As with all three plugins in the Sonnox Restore suite, you have the option to listen to the "Diff" signal, which is the difference between the input signal and the processed output signal. This is useful for listening to the noise being removed and making sure that no "good" sound is being removed from the output signal.